📡 Stay ahead of invisible waves—because your health deserves the smartest shield!
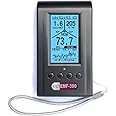
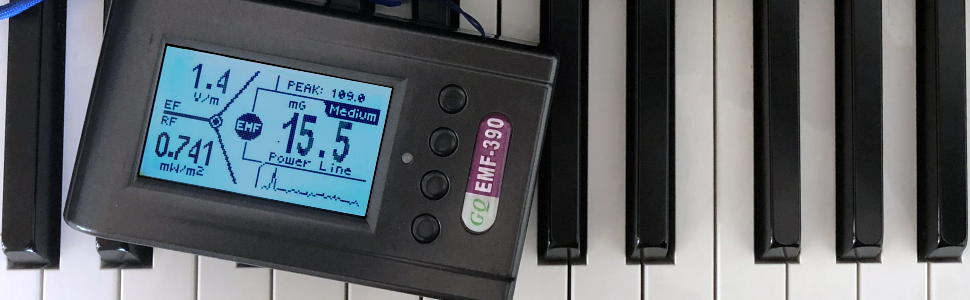
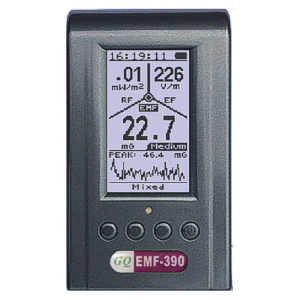
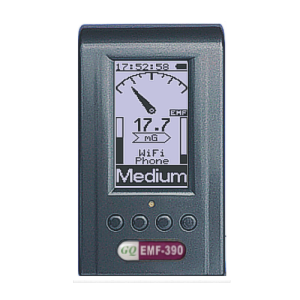
The GQ EMF-390 is a cutting-edge, battery-powered electromagnetic field meter designed for professionals and health-conscious users. It detects EMF, ELF, and RF signals up to 10 GHz, including 5G and smart meters, featuring a built-in spectrum analyzer and data logger for real-time monitoring and analysis. Compact and lightweight, it offers instant safety feedback to help you understand and manage your electromagnetic environment with confidence.


| Brand | GQ |
| Power Source | Battery Powered |
| Item Weight | 10 Ounces |
| Maximum Range | 10 Meters |
| Mounting Type | Tabletop |
| Number of Batteries | 1 LR44 batteries required. |
| Manufacturer | GQ Electronics LLC |
| Frequency | 10 GHz |
| UPC | 723794245272 723794245364 |
| Part Number | EMF-390 |
| Item Weight | 10 ounces |
| Product Dimensions | 5.5 x 3 x 1 inches |
| Country of Origin | USA |
| Item model number | EMF-390 |
| Batteries | 1 LR44 batteries required. |
| Is Discontinued By Manufacturer | No |
| Item Package Quantity | 1 |
| Batteries Included? | No |
| Batteries Required? | No |
| Battery Cell Type | Lithium Ion |
L**N
Best Smart Health Tool on the Market!
Boy is this handy & informative Very Smart Health Tool to have. Especially if you are on the OptOut list from Smart Meters! It helps you locate & measure any EMFs in & around house, property, neighborhood, electric car(!), office etc. Really glad we chose this one , as will accurately measure any EMFs including dirty electricity of improperly ir old wired homes, radio frequencies from Smart Meter, smart phone, smart appliances etc.To test: Turn on (will be in the emf read mode) & put up to utility meter level at the dark aperture slot. If it immediately starts beeping & flashes red (danger levels), then set it onto RF, will give you more particulars & a graph readout. Then can test up to 5 frequency ranges. Can save data & transfer to computer.Elster AB1 analog faceplate electro-mechanical meters are 'stealth' meters. According to Honeywell the "Elster the AB1 analog meter, can conveniently be initially or retroactively easily outfitted with communication capacity, 1 or 2 way." [=RF chips].
Ю**О
Точний
Супер!
S**N
SNIFFING OUR THE BAD VIBES
This meter did everything I hoped it would. It helped me find a way to isolate my WiFi base which was irradiating my brain too much. You can also test you microwave oven with it. But, best of all, you can bring it out when your friends visit and show them how advanced you are in the snooping traditions. Many a conspiracy fails to cause real panic because no one could prove anything for sure. This will help you prove that Area 51 is frying us all with EMF.
R**R
Good meter - but you gotta learn to sweet talk to it.
I just got my GQ EMF-390 meter and have spent a number of hours playing with it and testing it. I like it, and it's a good meter, but you gotta learn to sweet talk to it. In other words, you have to invest some time in learning how to use it properly.I am in training with the Building Biology Institute to become an Electromagnetic Radiation Specialist. I'm speaking for me, not for them though. But, I mention it because I've spent a lot of time studying EMF meters and EMF measurements lately. That point of view affects how I view these instruments.Consider this an introduction to a review, as I just realized I'm running out of time and have to continue later. So, for the moment, I'll just post some high points.01) This is a consumer grade instrument, which they say in the FAQ, not professional grade. So, balance your expectations accordingly. However, that doesn't mean it can't be useful to a professional, as well as consumers.02) The quick start guide is just that. Do read it. But realize that's only the beginning of your journey. Download the full user guide, which is a PDF of many pages, and go through that. At least their documents are written in mostly good English, as opposed to Chinese-English. As a bonus, the quick start guide is in color.03) Learn how to operate the controls. This may not be obvious at first. Once you're used to them, it will seem much more natural. While the buttons don't have printed labels on them, they do have shapes molded into the plastic, which you can see if you look.Some buttons do different things depending on whether you press and release, or press and hold.If you have the meter facing you, in landscape (wide) mode, and the buttons and model number are on the right:The TOP button, which they call S4, can: check the battery when powered off, power the unit on and off, activate the menu system when powered on, select items in the menu system, and sometimes change things in the menu system.The BOTTOM button, which they call S1, can: back you out of most menus, activate a menu to select the different screens of the device.So, an effective technique to go through menu settings is: press the TOP S4 button to get into the menu, press one of the middle buttons to navigate, press the TOP S4 to select an option, press the middle buttons to change an option, press the TOP S4 button to finalize your answer. Sometimes, pressing S4 will change an answer, so make sure the screen says what you want when you're done. You can then get out of the menu system with the BOTTOM S1 button. You can, if you wish, go back into the menu, and examine each setting without changing it to verify the settings.When not in a menu, the middle S2 and S3 buttons do various things, like allowing you to alter units, switching from EMF (magnetic and electric field) mode, to RF (radio field mode), moving a cursor, zooming in or out, etc. You kind of have to play with these buttons on each screen. Sometimes they do something different if you hold them down.04) IMPORTANT, learn how to point the meter. Inexpensive meters have sensors which are directional, and they care about how they're oriented in space. This meter has a 3 axis magnetic field sensor, which they label on the screen as EMF. So, you can turn the meter any way you want to read magnetic fields. BUT, the electric field sensor (EF), and the radio field sensor (RF) are directional. If you're pointing the meter the wrong way, you may get wrong readings, or no readings.This is documented on page 5 of the quick start guide, as well as in the PDF. Nevertheless, it bit me and caused me to lose some sleep last night fretting with it. I haven't done much with the EF sensor, but I've been working with RF. This meter may NOT work like you expect, but it will work if you treat it right. My Safe and Sound Pro II meter and my Cornet ED88TPlus will both respond to most RF signals if you are holding the meter in front of you in portrait mode (vertically), with the display facing you, and the RF source, like a cell tower, out in front of you. This meter will NOT respond that way. With this meter, you would be pointing it's sensor up into the sky.Imagine this meter is a small airplane. Place the meter flat on a table with the buttons and label near you and the display face up. The near end with the buttons is the tail. The far end where the propeller of a plane would be (its nose) is the front. The far end, as in edge, of the meter is where the RF sensor is pointing. If there were a cell tower, for example, out in front of your table, you could get a reading on it. In terms of an airplane, pitch means to bring the nose up or down. Yaw means to slide the tail left or right, turning without changing the bank of the wings. And roll means to bank or tilt the wings left or right. Rolling left or right is (sort of) what a race car does going around a sharp turn on a banked track.For lack of better terms to use, this meter CARES about pitch, roll, and yaw. If you pitch the nose of the meter up or down substantially off the line to the source, you will get bad or no readings. If you yaw the meter left or right substantially off the line to the source, you will get bad or no readings. But, that's not all. The meter cares about roll too.All radio waves move outward from the source. But they also have orientation in space. They may be oriented vertically as they move outward. This is called vertical polarization. This usually requires a vertically oriented antenna to receive well. They may be oriented horizontally as they move outward. This is less common and is called horizontal polarization. This usually requires a horizontally oriented antenna to receive well. There are even some sources which are circularly polarized.If you have a cordless phone, you could test your meter with it. At least in the US, almost all cordless phone base stations radiate a strong signal all the time. One you should not stay around. Remember that verbiage on the box that says it will work 900 m away? But you don't sit 900 m away do you? I have decommissioned all my cordless phones. But, they make a great little personal microwave beacon for testing. Just plug in the cordless phone base station to a power source, set it several feet away, and start taking readings. It should put out a continuous signal. On meters with a histogram mode or moving graph mode, like the GQ EMF-390 or the Cornet ED88TPlus, you should see a continuous signal or a continuous string of pulses. You can also test the meter pointing it at a cell tower, etc.So, what this all this means is, assume you have pointed the meter up and down (pitch) to line up with the source, and you have pointed the meter left to right (yaw) to line up with the source, and it's lying flat on the table (or in your hand) with the display up (roll), you STILL may not get a good reading. This was my experience testing with the cordless phone base station. I had to roll the meter 90 degrees, so the display was facing to my left. THEN, I got a strong and consistent reading.You may have to do similar gymnastics with the Cornet ED88TPlus and other meters. This is true with any meter with single axis sensors. This may make the display hard to read because it's facing away from you. The difference between this meter and the Safe and Sound Pro II and the Cornet ED88TPlus is that those measure RF with the display facing you as you might expect, and this one doesn't.That's it for now. I hope to add more later. This should get you started. Forgive any typos as I was in a hurry.Bottom line, this seems to be a good meter if you understand its limitations and treat it properly. If you treat it wrongly, it will give you bad readings in return.Hope it helps.Ron
M**H
nice product
love this
V**Y
Replaceable battery & usb c charging
Receiving similar reading with my Trifield meter, comes with a usb c charging port & the 18650 battery can be replaced.
P**N
Extremely versatile and useful at a low price. Outstanding value
This unit is amazing There are several screens to see EMF, EM and RF. One screen shows all 3 at one. Another is a graph show the quantified amount of EM and EM. But what we found especially useful that was not clear to me when we purchased it is the screen that shows and can document the frequencies and thier dBms hitting your home. With triangulation you can locate the origin signals, UMTS towers included. It will track all your data, the only cavet is that a Microsoft operating system is needed to track data. We had experts come to check our home with the expensive spectrum analyzer. He was very taken with this unit. It is so useful!
Trustpilot
4 days ago
2 months ago