📸 Frame Your Vision with Style!
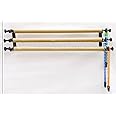
The CowboyStudio Photography 3-Roller Wall Mounting Manual Background Support System is a professional-grade backdrop solution featuring two tri-fold hooks and six expandable bars, designed for easy installation and maximum stability. Perfect for photographers looking to enhance their studio setup or create stunning visuals on location.
B**H
Exactly what I hoped for
Gear-snobs on photography forums talk a lot of smack about Cowboy Studio, even though those who are doing the talking don't seem to have much or ANY experience with the actual gear. It seems to be predicated on the fact that it's not expensive and not their precious, expensive name brand gear.I'm no gear-snob. I have one criteria only that a product must pass, and I don't care who manufactures or sells it: Does it work? I've bought a few things from Cowboy Studio over the years, and have never been disappointed yet, so I don't personally put much faith in the gear-snob naysayers when it comes to that, since my ACTUAL experience with the products keeps proving them wrong.This DOES work, and I mean it works REALLY well. I seriously LOVE IT! This has made life SO MUCH easier in my studio, I can't begin to sing it's praises enough.The reason I got it was that I simply got tired of dealing with background stands and bars, lowering and raising to change out papers and muslins on them, and all that goes with that. Plus, I only had one background set, and breaking it all down for transport to shoot out of studio, then bringing it all back and setting it all up again was no fun. So I started looking for a better, more efficient way to work with my backgrounds, and found this.I did a lot of research on this kind of background system after stumbling on it, and it looks to me like they're all almost exactly the same. The only real difference I could ascertain from looking at them and reading reviews was the price. They all have a metal 3-holder bracket, plastic chains and the same kind of roll holders and chain weights.I ordered this one primarily because of the low price compared to the others I looked at, and have not been disappointed in the least.After carefully measuring and marking where to put them, installation of the brackets was easily accomplished with my battery operated drill while standing on a 6' ladder in my 9' ceiling studio. I screwed mine into the wooden ceiling with drywall screws, rather than into the wall with the included hardware. The brackets work either way, on a wall or ceiling.To prepare the paper and muslin backgrounds for installation, I put a weight at the bottom of each background so that it would stay tight, taught and reduce problems with wrinkles and so on when being used, and also to keep it from spinning loose when not being used, especially with the paper. I used 10' lengths of 1" metal EMT from a big box home improvement store, which worked out great for the purpose.Next, I installed the roll holders that come with the kit into the cardboard tube of the 9' seamless paper roll, and into two 9' x 2" PVC conduits that hold muslin cloth backgrounds that I rolled onto them after installing them onto the ceiling brackets. I chose 2" gray schedule 40 conduit at a big box home improvement store because it seemed stiffer and stronger than the white conduit. They come in 10' lengths, so I had to cut them down to size. When choosing them, I carefully inspected to be sure I wasn't picking out any that were warped or bent in any way, so that they wouldn't sag, wobble or wrinkle the backgrounds.To get the rolls up to the brackets 9' in the air by myself, I installed a small "U" bracket into the ceiling near one bracket, ran a clothesline through it, and tied it around the end of one of the rolls. Then I climbed the ladder up to the other bracket while holding the other end of the roll, and by pulling on the clothesline I was able to pull the other end of the roll up to bracket height from where I was positioned at the other bracket. With the roll horizontal, I could position my end into the bracket easily. I then tied the clothesline off temporarily so that the other end wouldn't drop while I climbed down and repositioned the ladder on the other end - the clothesline bracket end. Then I climbed up and positioned that end of the roll into the bracket, removed the clothesline from the roll, placed the chain and weight, then adjusted the length of the chain by removing a section of the links, which was easy. One more move of the ladder to untie the clothesline on the other end, and I had a roll in place on the brackets.Lastly, I pulled the backdrop down to check for tension. The lower it goes, the more weight there is trying to pull it down to spin it off the roll. Adjustment is easy with a tensioning knob, though it would have been easier to work with if it was on the same side as the chain roll-holder, but it's not. This is where a second person working the chains while the first works the tensioning knob can be a really big help.I did that twice more to get the other two rolls up by myself. If you have someone to help, it will go much easier, especially if you each have a ladder or platforms to work from (or are really tall), depending on how high / accessible you mount the brackets.In the end, the system works really great! I've got no complaints at all about it. I wondered if a plastic chain would be hearty enough for this, but since all the kits used them, I guessed it would be okay, and it's working fine. I don't anticipate any problems with it, as long as I don't try anything crazy with it, and the chain is really easy to repair if one of the links was to somehow break.All in all, I very satisfied with this product and this purchase in every way, and would easily recommend it to anyone looking for a background system like this.
D**E
Incredible price, works as it's supposed to
If you've looked around, you've seen the price that the mainstream manufacturers charge for the same system. That, and this is one of those cases where a little extra quality you might get in a more expensive system will gain you absolutely nothing, so why spend more?The DesignYou can mount this to the wall or to the ceiling, i chose the ceiling, to save as much space, It just kinda floats over the windows in my living room and doesn't get in the way when rolled up. There are 4 parts to the system: The bracket which holds everything, the expanding rods which attach to your seamless paper tube or pvc/metal tube and allow it to connect to the bracket, the chain, and the chain weights. The expanding rods hold nice and tight, and have two slots to choose from when mounting, you also can adjust how tight or loose the system is when lowering/raising.QualityI can easily see the lack of attention to detail in the welding of the brackets, but it's by no means inadequate, i mean common, it's a bracket, as long as it's solid and not warped, it's all that you need. the metal is sufficiently thick, and once bolted to a stud or joist, it feels solid as anything.UseYou can use seamless paper with the tubes as is, or get a pvc/metal tube to attach your muslin to. One other thing i recommend adding is some weight to the edge of the paper/muslin, so that it comes down strait, and stores in a higher position. I simply put a clamp on either end and that does the trick, or you can get a thin strip of wood and screw it in, or another pvc pipe, etc...Also, this might seem obvious, but you don't need to use the full length of chain, i use less than half so that less is dangling from my ceiling.MountingI can also point out, that in my case i didn't have two ceiling joists in the right positions to get both ends of the brackets secured, and to make things worse, my joist is apparently warped, so it's not in a strait line. So, i lined up the bracket so that i was able to get at one end of one of them into a joist, and for the other bracket, i drilled a new hole into the metal so i could get it into that joist. Then for the other ends of the brackets which had no joist around, i used a toggle bolts. Not ideal, but has held well and feels secure. More ideal would be to get a 2x4 and bridge two joists and then mount to the 2x4Important note! when mounting, it's important to get it level, and guess what? Many ceilings aren't level! Easy fix: whichever side is higher, just use some shims to lower it. Or in my case i just backed out the screws a few mm.Note about the photos, the included chains are about twice as long, i just opted to use less of them
H**Y
I would buy it again
As with every home project, installing this took three trips to the hardware store.First - as others have said, the bolts the come with this system are NOT for drywall. (The hardware store guy said they were for concrete patios - like to secure an umbrella stand.)Aside from drywall bolts, the only other thing you need to buy is the lengths of pipe. I brought one of the end pieces with me to be sure to buy the correct diameter PVC pipe. It is 2" pipe.I set mine up quite long (I think it is 113 inches long), and my PVC pipe sags a little in the middle, especially the one that has a roll of fabric store felt fabric, but it still functions fine.I followed someone's recommendation and flipped the pull chain for the middle roll so the three weren't all so close.The system works fine for me. I don't think it would stand up to a busy full time photo studio use, but it seems fine for my part time use.The only issue I have is that the second and third rolls are covered by the first roll at the top. My ceilings are not high, and I need every vertical inch of my backdrops. So, I roll down the third one in front of the other two. It looks a little funny, but its OK on the photos.It took quite a bit of time to install this system, but not more than I expected. I watched several online videos, which helped. (Sorry I didn't make a video of our installation.)The best part is I've added 3+ feet to the length of my home studio by getting rid of my home made PVC pipe backdrop stand! The backdrops lay right up against a wall, and the room feels much bigger.
Trustpilot
1 month ago
1 month ago